Using the Site Editor to Customize a Website Experience
The Gallery Site Editor is used to customize the look and feel of Website, Landing Page and Live Event Experiences. Click on the experience title to open the Site Editor. The Site Editor provides the ability to:
- Customize the player layout
- Add objects to pages
- Add videos to a site
- Customize the site style
- Configure calls-to-action
- Customize appearance and behavior
- Customize site features
- Customize video and playback
- Customize the site configuration
- Configure the site details
These options are accessed by clicking the menus in the left navigation.
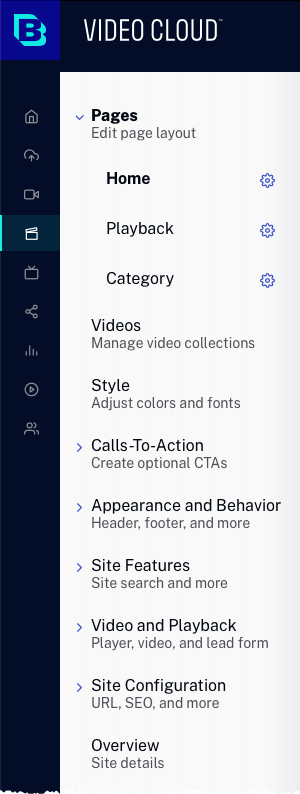
Customizing the player layout
To customize the player layout, click Pages in the left navigation. Depending on the template that was selected when the site was created, the player layout may be able to be changed. If the player layout can be changed, a settings icon (![]() ) will appear next to the page name.
) will appear next to the page name.
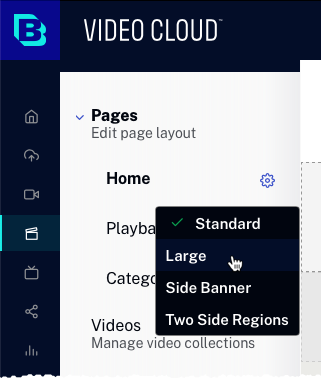
Click on the settings icon to select a new player layout. Note that changing the layout may change the size and positioning of the player on the page. For more information on changing the player layout, see Changing the Player Layout on a Website Experience.
Adding objects to a page
Objects such as text, images and URLs can be added to pages allowing you to customize and brand your video experience. To learn how to add objects to video site pages, see Customizing the Content of Website Experience Pages.
Adding videos to a site
To add videos to a site, click Videos in the left navigation. For complete details on how to add videos to a video site, see Adding Videos to a Website Experience.
Customizing the site style
To customize the colors and fonts used on the site, or to select another theme, click Style in the left navigation. For complete details on how to customize the style, see Customizing the Style of a Website Experience.
Configuring calls-to-action
Calls to action provide the ability to include custom HTML, images or advertisements on a page. Not all templates support calls to action. To configure calls to action, click Calls-To-Action in the left navigation.
For complete details on configuring calls to action, see Configuring Calls to Action on a Website Experience.
Customizing the appearance and behavior
The appearance and behavior settings are used to configure the template settings, use a custom header/footer and provide custom CSS and JavaScript files. To configure the appearance and behavior settings, click Appearance and Behavior in the left navigation.
For complete details on the appearance and behavior settings, see Customizing the Appearance and Behavior of a Website Experience.
Customizing site features
The site feature settings are used to enable site search, configure social sharing options and allow commenting on videos. To configure the site features, click Site Features in the left navigation.
For complete details on how to customize the site features, see Customizing the Site Features of a Website Experience.
Customizing the video and playback settings
The video and playback settings provide the ability to select a custom player for the experience, configure Campaign integration and lead forms and configure videos options such as downloads and related links. To customize the video and playback settings, click Video and Playback in the left navigation.
For complete details on configuring the video and playback settings, see Customizing the Video and Playback Settings of a Website Experience.
Customizing the site configuration
The site configuration settings provide the ability to host the site at a custom domain, secure it using SSL or restrict access to the site. To configure the site configuration, click Site Configuration in the left navigation.
For complete details on site configuration settings, see Customizing the Site Configuration of a Website Experience.
Configuring the site details
The overview settings provide the ability to edit the name, description and language for the site. To configure the site details, click Overview in the left navigation.
For complete details on configuring the site details, see Configuring the Details for a Website Experience.